Embedded Rust BSPs with µFerris & XIAO: Device Setup & Getting Started
An all-in-one open-source learner board for embedded Rust, built around the Seeed Studio XIAO platform.

This is the first post in the µFerris & Xiao BSP series. In this series, the µFerris platform will be introduced, followed by building a Board Support Package from scratch, one peripheral at a time.
Introduction
Embedded Rust has a challenging learning curve. The language itself is demanding, and embedded adds hardware, among other challenges, on top of that. In any learning path you adopt, at some point, you need a board in your hand, LEDs to blink, and a buzzer to annoy the people around you. The trouble is that picking hardware is its own rabbit hole: which controller, which peripherals, which breakout boards, and how do you wire it all together without frying something? Or even spending hours debugging wiring issues.
µFerris was the answer to that problem. It's an all-in-one learner board built specifically to smooth the embedded Rust learning curve. It packs the standard peripherals you need to learn embedded systems: GPIO, timers, analog, PWM, and serial communication, all on a single board. µFerris is also designed around the Seeed Studio XIAO platform, so you can swap controllers without changing anything else. One board, one set of peripherals, and the freedom to learn on an ESP32, an RP2040, an nRF52, or whatever XIAO you reach for.

µFerris was also designed as companion hardware and a natural extension to the Simplified Embedded Rust books. Simplified Embedded Rust eases the learning curve by focusing on simulation-based examples. In fact, you can finish the whole book without touching hardware. µFerris works as a companion to Simplified Embedded Rust so learners can transition to hardware smoothly once they become comfortable with the space. Essentially, by running the same code in the book, a learner would know exactly what the output should look like.
In this post, I'll introduce µFerris, walk through the hardware, set up your toolchain, and flash your first program. This is the entry point to a whole series where we'll go from blinking a single LED to building a full Board Support Package (BSP) from scratch.
🦀 What is µFerris?
µFerris is a versatile, all-in-one learner board designed to:
Support multiple controllers on a single reference platform.
Let you exercise every standard peripheral: GPIO, timers/counters, analog, PWM, and serial comms.
Allow learners to build a complete embedded product replica: the on-board components are arranged so you can build something resembling a real digital alarm clock.
Serve as a centralized reference for Rust embedded beginners.
The design philosophy is simple: instead of buying a controller, a handful of breakout boards, a breadboard, and a tangle of jumper wires, you get one board with everything already wired and documented. You spend your time writing Rust, not debugging your wiring.
µFerris is also certified open source hardware by the Open Source Hardware Association (OSHWA). All board designs are licensed under CC BY-SA 4.0, and all firmware examples are MIT-licensed. Schematics, PCB files, BOMs, and pin mappings all live openly in the uferris-hw repository.
🧱 Board Variants
The µFerris platform consists of three pieces. To get started, you need, at a minimum, the baseboard and an XIAO module; the powerboard is optional.
The Megalops Baseboard
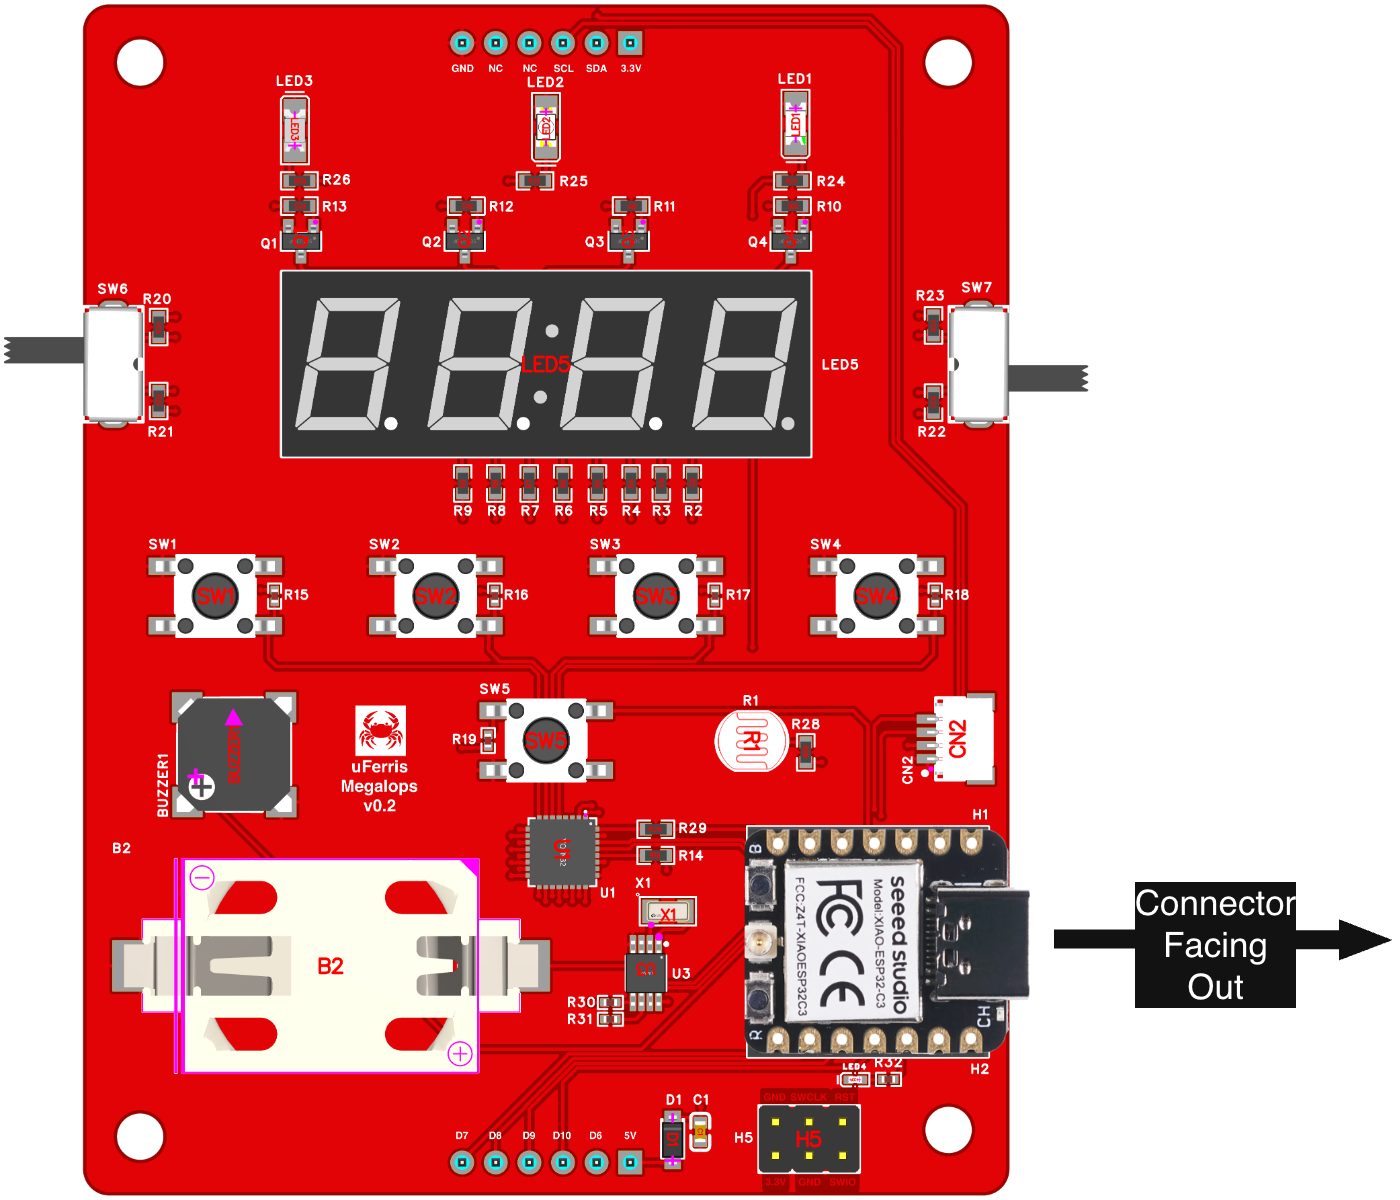
The baseboard is the heart of µFerris. It's built around the Seeed Studio XIAO header, so it accepts a wide range of controllers, and it's populated with components that let you practice across all the standard peripherals.
On-board components:
3 LEDs (1 direct GPIO, 2 via an I/O expander)
Buzzer (direct GPIO/PWM)
5 push buttons (1 direct GPIO, 4 via the I/O expander)
2 toggle switches (via the I/O expander)
Light sensor (LDR, analog input)
4-digit 7-segment display (via the I/O expander)
TCA6424A I/O expander (I2C)
RTC and a Qwiic connector on the I2C bus

The Megalops Power Extension Board (Optional)
The power extension board lets the baseboard run independently of USB power. It adds:
A 2×AAA battery holder for standalone operation.
A current measurement circuit for power profiling (great for learning how to measure and optimize consumption).
An SD card slot for data logging over SPI.

🔌 The XIAO Platform
What makes µFerris flexible is that it doesn't commit you to a single microcontroller. It's built around the Seeed Studio XIAO form factor. The XIAO form factor is a tiny, standardized module footprint that Seeed produces with many different controllers behind the same pinout.
That means you can start learning on, say, a XIAO ESP32-C3, and later drop in a XIAO RP2040 or a XIAO nRF52840 to see how the same peripheral works across different HALs; without touching your wiring or buying a new board. The XIAO board itself is not costly either. For someone learning embedded Rust, that's a huge deal: you get to compare ecosystems on identical hardware.
For this guide, I'll use the XIAO ESP32-C3 as the reference controller.
🛒 Getting the Hardware
If you'd rather not fabricate the boards yourself, pre-built µFerris hardware is available from The Embedded Rustacean Store. You'll also need a XIAO module:
µFerris Megalops Baseboard: The Embedded Rustacean Store
µFerris Power Extension Board (optional): The Embedded Rustacean Store
Seeed Studio XIAO module: SeeedStudio Store
And if you want to build the boards yourself, all design files (Gerbers, BOM, pick-and-place, schematics) are in the uferris-hw repo.
🔧 Assembling µFerris
Mounting the XIAO Module
The XIAO mounts onto the baseboard's XIAO header. The key rule: the USB connector on the XIAO must always face outward (toward the edge of the board).
Mounting the Power Extension Board
To attach the powerboard, align both the top and bottom headers of the baseboard with the power extension board, then press down until the baseboard is firmly seated. The XIAO header on the baseboard and the battery holder on the powerboard should both face downward. Newer board editions include mounting markers that need to align with each other.
⚠️ WARNING: Incorrect orientation of the power extension board could damage the baseboard and/or the XIAO. Always verify the orientation before powering the board.
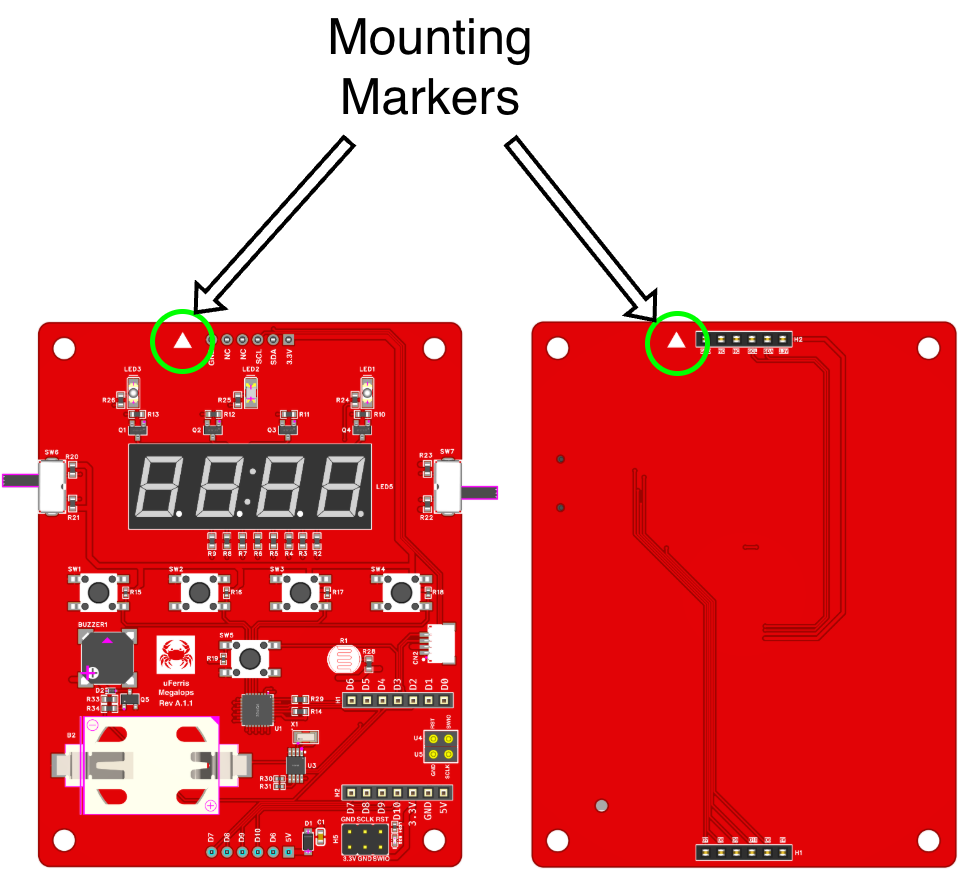
A quick note on power: the µFerris is powered and controlled by the XIAO module, which itself can be powered from three sources—the XIAO's USB-C connector, the powerboard's 2×AAA batteries, or the SWD debug connection. You can keep the USB-C connected while the powerboard is attached, but flashing and serial communication may fail if the batteries are inserted at the same time.
💾 Toolchain Setup
Let's get a Rust toolchain ready for the XIAO ESP32-C3.
1. Install Rust
curl --proto '=https' --tlsv1.2 -sSf https://sh.rustup.rs | sh
2. Install xiao-generate
cargo install xiao-generate --locked
xiao-generate is a Rust project template generator for Seeed XIAO modules. Learn more about it here.
🚀 Your First Project
1. Generate a new project
xiao-generate --chip esp32c3 --name blinky
cd blinky
2. Write the blink code
Replace the contents of src/main.rs with the following. We're driving LED 1 (the "Alarm" LED), which is wired directly to GPIO3 on the XIAO ESP32-C3:
#![no_std]
#![no_main]

use esp_backtrace as _;
use esp_hal::delay::Delay;
use esp_hal::gpio::{Level, Output};
use log::info;

#[esp_hal::main]
fn main() -> ! {
    let config = esp_hal::Config::default();
    let peripherals = esp_hal::init(config);

    let mut led = Output::new(peripherals.GPIO3, Level::Low);
    let delay = Delay::new();

    info!("Blinking LED 1!");

    loop {
        led.toggle();
        delay.delay_millis(500);
    }
}
3. Connect and flash
Connect the XIAO to your machine over USB-C, then build and flash in one step:
cargo run --release
LED 1 on the µFerris board should start blinking. 🎉
📦 Running the Bundled Examples
Blinking an LED by poking GPIO3 directly works, but it means you have to know which pin every component is on. That's exactly the problem a Board Support Package (BSP) solves. The µFerris BSP wraps the board's peripherals behind a clean, hardware-agnostic API that works across all supported XIAO controllers.
The crate ships self-contained example projects, one per supported board, under examples/. They're the fastest way to see the whole board API in action. Clone the repo and run the blinky example:
git clone https://github.com/uFerris-rs/uferris-bsp.git
cd uferris-bsp/examples/xiao-esp32c3
cargo run --bin blinky
Three examples are available for the C3:
blinky— the same LED blink as above, but driven through the BSP API instead of a rawGPIO3handle.baseboard_demo— exercises the full baseboard: LEDs, buzzer, LDR, RTC, seven-segment display, buttons, and slide switches.full_board_demo— everything inbaseboard_demoplus the Power Extension Board. It's gated behind thepower-boardfeature:
cargo run --bin full_board_demo --features power-board
🗺️ What's Next
This post gets you onboarded with hardware in hand, toolchain installed, & first LED blinking. From here, the series will introduce the following:
Using the µFerris BSP: In the next post, we'll dig into the
uferris-bspcrate properly: how to use it, how to switch between different XIAO controllers, and how to use the methods.Building a BSP from scratch After that, we start from an empty project and incrementally build a BSP ourselves, one peripheral at a time. If you want to understand how a BSP actually works (and learn embedded Rust along the way), that's the main event.
Conclusion
µFerris exists to remove the friction between you and hands-on embedded Rust. One board, every standard peripheral, swappable controllers, and fully open hardware. In this post, we covered what µFerris is, walked through the baseboard and power extension board, assembled the hardware, set up the toolchain, and flashed a first program. In the next post, we'll start putting the uferris-bsp crate to work. See you there.